Hey everyone! Sorry, I haven't posted anything for a while. My kids and I have been sick and then of course, the holidays have kept us busy. My husband is busy working all week (no days off *sigh*) and I've been busying trying to handle most of it myself.
Anyways, I had a lot of fun with my son the other day. We've been learning basic addition and subtraction using the montessori methods and I wanted to do something fun for him the other day to spice it up a bit. I decided to play chutes and ladders with my son. I got rid of the spinner (although you can use the spinner instead) and traded it for a regular 6 sided die. We played like you would normally, but instead we rolled the die twice and added the two numbers together and went that many spaces. It really is helping him get faster in his addition facts. I have him write his problems down. The first game he did 24 problems before I won and the second game we only did 5 problems. I plan to buy the 10 and 20 sided die from the learning store and a blank die so we can get harder problems, etc.
To plan the game with subtraction, use a 10 sided die and say for the whole game whatever you roll subtract and then pick a number to subtract like 2 and then go that many spaces. or use the 10 or 20 sided die and use a 6 sided die to roll to see how many you need to subtract.
Another great thing about chutes and ladders is that the spaces are numbered 1 to 100. So it's also great that you can roll the die and say you get a 6. Have your child add 6 to whatever the number is that the person is on (say space 22) and then move their person to that numbered square without counting the spaces out. They gotta do the math! Also, if they go up a ladder, have them figure out how many spaces they got to skip buy using the numbers on the two spaces or when the go down a slide how many spaces did they get behind. there a lot of great questions you can ask and have them figure out. You don't get tons of problems in, but your questions are word problems and you're helping them use math in their life so they are more interested. You can also ask questions about how many more spaces do you need until you win? etc. just keep asking questions in conversation as you play and have fun!
Monday, December 22, 2008
Friday, November 21, 2008
Macarena Bones
This is my first ever attempt at making any type of movie. This little movie took forever to make last night and a little this morning. I finally figured out some very basic things that made it so much easier this morning (if only I knew them last night!) So please leave me a comment and let me know how you liked it!
This song is by Dr. Jean from her cd "Kiss your brain" I have two of her cd's and absolutely love her songs. I plan to buy more of her songs. I really, really hate when they don't have 30 second sound bytes so you can see if you like the songs or not. So for those of you that haven't heard from her, check out this song and no her others are really fun and easy for kids to follow, as this one is. I seriously want all her cd's, lol.
I plan to make 3-part cards with the pictures I made to use in this video, if you would rather teach with those, but the song is fun, I just had to share it. The words to the song are:
Tarsals
Tibia
Fibula
Patella
Femur
Pelvis
Ribs
Sternum
Carpal
Ulna
Radius
Humerus
Hey! Kiss My
Cranium
This repeats 4 times. And it is to the macarena dance, so dance along too if you want, LOL. I plan to have my son watch the video from time to time, but mostly to teach him the song while we point out the bones on a large picture of a skeleton (that I still need to get) and then using the 3-part cards as practice by themselves and I will probably make a labelled and unlabelled skeleton worksheet you can use as a test.
Just know, that it's finally getting really cold where I live and so this weekend and next week I will be making curtains for my bedroom. We have 4 large windows in our master bedroom and we are freezing! Plus, we will be out of town for 4 days for thanksgiving. I have made some singular and plural language arts cards, but I still need to fix a couple of things....so look forward to the 3-part cards and those cards in about a week and a half. I also have been collecting cards for the continent cards that I hope to make soon as well.
Tuesday, November 18, 2008
Continent Song
My kids really like this continent song. This isn't my video. I had a cd with this song on it last year and I can't find it anymore, but found this cute little boy singing the same song on youtube.
I taught this to my daughter's preschool class today and the kids had fun with it. I taught them about the globe and I used an inflatable (beach ball type) globe at first. I talked about the shape being a sphere and then I cut the globe in half so it'd match perfectly with the world map so they can see how they went from a 3d to a 2d object and we talked about why antarctica in on both parts of the world map, etc. During the song, I pointed to each of the continents on the world puzzle map as we sang it and then handed them out each a puzzle piece and they put it in the right spot and said the continent's name. I also traced North America, South america and antarctica. I cut around the continents (we didn't have enough school time to let the kids do it) and the kids glued the continents on the right spot on a paper plate. Then with finger paints they painted the continents green and the rest of the plate blue for the ocean. It was fun. Then we played this CD:

We listened to 4 different songs on the track to here the different types of music you'd hear around the globe and I handed out some music instruments and we played and danced along to the music. I kept the cd on while we made the globes and had free play afterwards so they could hear all of the songs. You can buy the cd here. The cd is a ton of fun! I also got this book from our public library, it's called "Around the World in Eighty Poems". It has a bunch of small kid poems describing the culture or some tales of the different countries around the globe. The pictures are wonderful as well. I really want to buy this book!
I taught this to my daughter's preschool class today and the kids had fun with it. I taught them about the globe and I used an inflatable (beach ball type) globe at first. I talked about the shape being a sphere and then I cut the globe in half so it'd match perfectly with the world map so they can see how they went from a 3d to a 2d object and we talked about why antarctica in on both parts of the world map, etc. During the song, I pointed to each of the continents on the world puzzle map as we sang it and then handed them out each a puzzle piece and they put it in the right spot and said the continent's name. I also traced North America, South america and antarctica. I cut around the continents (we didn't have enough school time to let the kids do it) and the kids glued the continents on the right spot on a paper plate. Then with finger paints they painted the continents green and the rest of the plate blue for the ocean. It was fun. Then we played this CD:
We listened to 4 different songs on the track to here the different types of music you'd hear around the globe and I handed out some music instruments and we played and danced along to the music. I kept the cd on while we made the globes and had free play afterwards so they could hear all of the songs. You can buy the cd here. The cd is a ton of fun! I also got this book from our public library, it's called "Around the World in Eighty Poems". It has a bunch of small kid poems describing the culture or some tales of the different countries around the globe. The pictures are wonderful as well. I really want to buy this book!
Wednesday, November 12, 2008
Human Anatomy Book
I just found this new book called, "The Way We Work." It is an excellent book for kids teaching about the human anatomy. It's accurate and the pictures are great. This is not a textbook format type book, so the pictures aren't what you'd see all serious-like in a textbook. They have some normal textbook type pictures that are labelled and then the others are more like sketches or drawings that a kid would do....still accurate, but I think it appeals to the kids more this way. It is such a great book, I've been having a good time reading mine and can't wait to start using in school with my son! Just thought I'd give that recommendation out there. Go check it out!
Wednesday, November 05, 2008
Large Bead Frame Tutorial
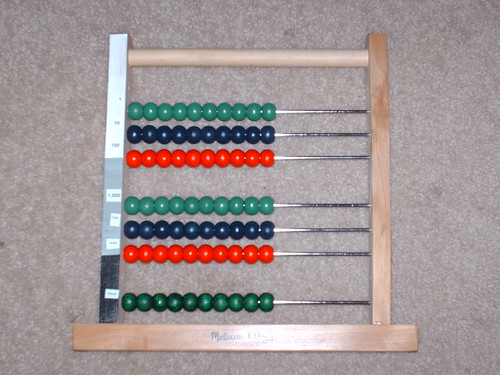
Did you know you can take acabus' apart? I had no clue and I got this idea from one of the many yahoo groups I am on. To make your own (cheaper) bead frame you need:
acabus (I used the Melissa and Doug one for $12)
green paint or permanent marker
black and white paint
paint brush
screwdriver
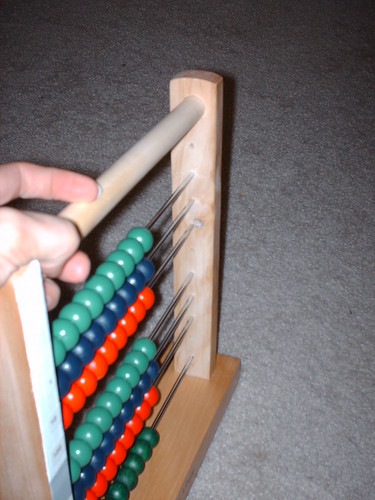
On the Melissa and Doug acabus there is one screw on each side of the wooden dowel across the top. Unscrew both of those screws. Then on the bottom one of the sides of the acabus has 2 screws holding it in place (the other side has none). Unscrew those too. Now this acabus is well put together and I'm sure it was glued together before it was screwed, so you have to tug and jiggle it around a bit, but that side with the screw will come loose and then you'll be able to pull the wooden dowel and the 10 metal rods and all the beads.
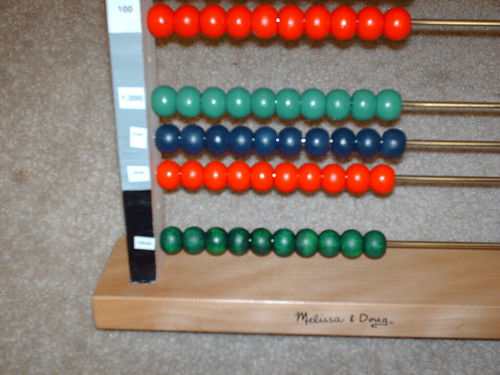
Remove all the beads from the rods and then remove the 1st, 5th, and 9th metal rod from the socket and discard. On the first metal rod (actually the 2nd one, but remember you removed the other one so now it's first), put on 10 of the green beads. On the next one, put on 10 blue beads and on the third one put on ten red beads. Then there should be a space and then repeat that again with 10 green, then 10 red and then 10 blue on the next 3 rods. On the last rod, there is supposed to be 10 green again, however, you are now out of green beads. On the melissa and doug acabus they have natural wood colored beads, so use 10 of those beads and paint them green. If you are lazy, like I was, you can use a green sharpie permenant marker and just color them. It worked great and wasn't messy at all. From a distance you can't even tell that I just colored them, but up close you can (see the last picture on the blog of the close-up). Once they are colored put them on the last rod. Then replace the other side of the acabus and screw it all back into place.
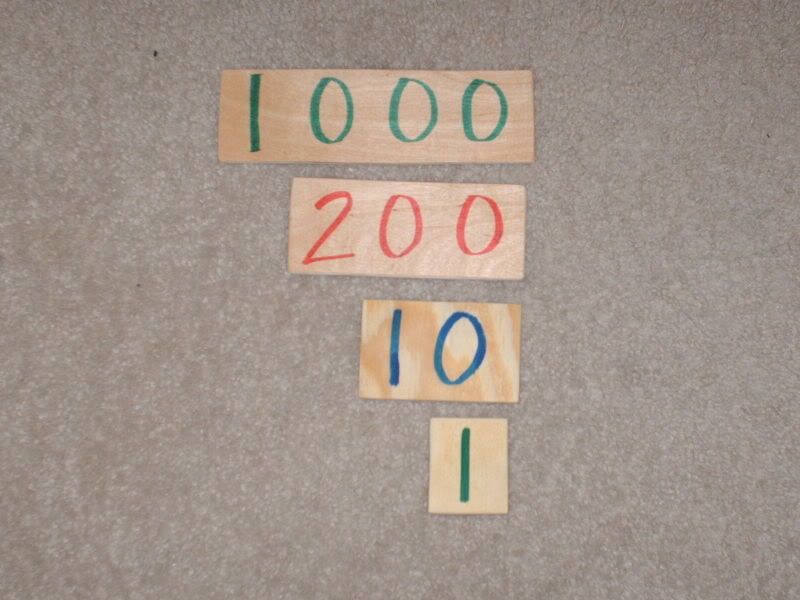
With the white paint, paint the entire front of the left side of the acabus. Then mix the black and the white to make grey and once the white paint is dry paint grey over the white starting below the first 3 metal rods all the way to the bottom so only the top is white. Then once that is dry paint from the below the 6th rod to the bottom with black paint. Lastly, you need to put the numbers on. You can paint them on with red paint. I used my label maker, because, again, I'm lazy and it's less messy. My label maker was only $15 at office depot and I use it to label all the containers I use for my montessori materials so I use it a ton! The numbers are
1
10
100
1,000
10,000
100,000
1,000,000
Anyways, I just thought it was great. I made this and it cost 1/2 the price of buying the cheapest one I could find anywhere on the internet and I also save the $8-15 they charge you for shipping. You could easily make the small bead frame the same way.
Tuesday, October 28, 2008
Dressing Frames
There are a lot of ways you can make your own dressing frames. My favorite ideas are:
1. Buy wooden 8 1/2 x 11 picture frames from the $1 store. Remove glass and the staple on the back of the frame baby clothes. Very easy and there's tons of small baby/toddler clothes at the second hand store if you don't have anymore.
2. To sew baby clothes onto a pillow cover of a small decorative pillow. It's easy to make a pillow case, use those standard instructions and then add the clothes ontop of the front piece before assembling and sew it together. These would make some fun pillows on your child's bed at night.
Lastly, I'm so excited! I got the BEST DEAL EVER on my local craigslist. I got this awesome play cube for only $20.
Here's the site for more information
My kids think it's great. It's 4 sided and has buttons, snaps, buckles, zipper, lacing, bowties, chrome closure, on every side so all three of my kids can work at the same time. It's also super fun and soft to jump on apperantly. It save me a lot of work for making dressing frames!
Saturday, October 25, 2008
Vertebrates and Invertebrates Cards for Science

Here are the vertebrates and invertebrates activity cards. I made two control cards and labels with definition as well.
Friday, October 24, 2008
Living & Non-living Cards and 5 Kingdom Cards
 More cards! I've been busy today. I have two different documents. The first document has the living and non-living labels and about 10 non-living picture cards. The second document has about 17 different living picture cards that have the living organisms name on it. It also has the 5 kingdoms (plants, protists, prokaryotes, fungi, animals) labels, their definitions and the 5 kingdoms label. So that document works as the kingdom cards and the living cards, so you may want to print out two sets of picture cards. The prokaryotes kingdom is made up of two groups the archaebacteria and eubacteria. Some books have 6 kingdoms and some have 5. The children's encylopedia that we have has them in 5 kingdoms with the eubacteria as a subgroup so I divided into 5 kingdoms. Just wanted you to know, as I don't know your preference!
Life Cycle Cards for Butterfly, Frog, Ladybug and Ant

I made the life cycle cards! I got these nice plastic life cycle 3d objects that my son absolutely loves and they are pretty big, so they are easy to handle and very durable. These are the ones I bought:
http://www.insectlore.com/dealers/lifecyclestages.html
The store by me, didn't have the other 3. They were $4.75 each and way worth it to me. Anyways, these are the pictures, labels and definition cards I made to go with these, but they can be used just fine on their own as well. I used real pictures I found off googling. I always use real pictures over drawings if I can find them! Let me know how you like them.
Ant
Butterfly
Ladybug
Frog
Monday, October 13, 2008
Montessori Research and Development Curriculumn
I was asked about my Montessori RD Curriculumn I am using, so I thought I'd do a quick post to answer some of those questions. All the manuals I bought from them have been elementary age since my son is doing 1st & 2nd grade work. Some lessons in the Math book start at 4 years of age so it does have lessons for the ten and teen board, etc. Here are the manuals I have:
--Language Arts 1: Grammar
--Geography Manual 1
--History Manual 1
--Mathematics Manual 1
--Zoology Manual 1
--Geometry Manual 1
--Botany Manual 1
--Chemistry Manual 1
--Fractions Manual 1
--Fractions Manual 2
So basically, I bought most of the 1st manuals for all the subjects in the elementary group. LOL. Right now, I am just working with my son in the Language Arts Manual, Geography, History, and Math. In January, I will start adding Zoology and Botany. The Geometry work, the kids need to be a little older than 6....maybe 8 I would start. Chemistry, there are a few lessons for the younger kids, but again I would wait until about 8 for most lessons. So eventually I'll add in some easier geometry and chemistry lessons. I don't know when I'll start fractions. I just saw those two manuals on ebay for a good price so I bought them!
I love these manuals. At the website they have the table of contents in pdf that you can view before you buy it so you'll know what's included. The lessons are really neat and clear more than one presentations for some of the lessons listed, sometimes she lists a book or two to get to compliment the lesson. Then the manual as sheets to photocopy to use for the lesson or they list what you need. For example, they have listed the Farm Cards and she individually listed every animal card that is in the Nienhuis Montessori cards. This is how I was able to make my own cards for everyone else! Instead of just saying you need farm cards, at the end of the lesson is a list so you can make your own cards to use with the lesson. Which, obviously I love. I would not be able teach my son using the montessori methods otherwise, there's just too much costs involved for us right now (with my husband doing a residency in a hospital). So, I love these manuals, I think they are really great.
I also wanted to say, before buying these I emailed the owner back and forth and she was really nice. I just had a few questions and she was really nice. You also have a choice if you want a bound or loose leaf manual. I choose loose leaf so I can put them in protective sheets (what can I say, sometimes I can be messy). The owner included the chemistry manual in their for free. She said it didn't bind right so she thought I could use it. How sweet was that? With my second order she added another for free as well. Same thing, it had binding issues and she couldn't sell it like that and since I wanted loose leaf she just added it free with my order. I used my cool knife and cut the pages out of the binding and put them in protective sheets and you can't even tell they were ever bound.
Lastly, the cost is why I bought these too. They aren't expensive at all and it's really every thing you need. Hope this helps everyone!
www.montessorird.com
Julie
Sunday, October 12, 2008
Pink Series Spelling Lists and Beginner and Advanced Sight Word Lists
Here is my last files for a couple of days. The first file is spelling lists for the pink series. There are the spelling cards with 6 words each for each vowel sound and then there is 6 more cards of review. Then there are sight word lists and then advanced sight word lists. I made all my pink series cards and sight words small enough that they fit into these plastic stands that www.montessorird.com has for sale. Check out their language arts section of the curriculumn materials store. Their stands are only $2 or $2.25 each, so it's a good deal and great way to organize the cards you are currently working on at a desk or on a tray.
Pink Spelling Lists
Sight Word Lists
Advanced Sight Word Lists
Pink Spelling Lists
Sight Word Lists
Advanced Sight Word Lists
Pink Series Word Lists, Pictures, and Word labels

I have a lot of cards for you! The first file are some cards that have 6 words listed on them each. Then there are cards with one picture on them each and then the word labels. Have the child pick one of the word lists and then find the six pictures that match the words on the list. Then have them find the correct labels. I like to have the child put the pictures under the word list on the floor and the labels under the picture. Then have them work on the next word list. Their are separate files for the a sounds, e sounds, i sounds, o sounds, and u sounds. Enjoy!
Pink AEIOU Word Lists
Pink Series A Sounds
Pink Series E Sounds
Pink Series I Sounds
Pink Series O Sounds
Pink Series U Sounds
Pink AEIOU Word Lists
Pink Series A Sounds
Pink Series E Sounds
Pink Series I Sounds
Pink Series O Sounds
Pink Series U Sounds
Pink Langauage Series: Alphabe Match-up & Mix-up
I got quite a bit of work done yesterday and a little today on the pink language series. I'm so excited, but at the same time, so sad I'm out of color ink! I need to hurry and get some and some more laminating sheets so my 4 year old can get started on these!
First, I have this alphabet match up. This is for teaching the lowercase letters. My 4 year old knows the uppercase letters, but doesn't know very many lowercase letters. These are strips of 4 letters. The first set is in order so the first strip has "A B C D", then there are the same strips but in lowercase letters. So you can sing the song with your child and lay out the uppercase strips in order and then have her put the lowercase strips underneath to match the correct letters. I did this in strips because that way if the child recognized 1 or 2 of the lowercase letters on that strip they should be able to easily match it to the correct uppercase strip. Doing this exercise will also help them see the ones they aren't familiar with as they match them up.
The second set of strips, the alphabet is all mixed up. I made sure to put b and d on the same strip and q and p on the same strip so that they can learn the differences between the two. Once your child has worked with both of these sets, then I'd move onto matching individual letter cards. I will be making the individual cards soon!
Alphabet Match 1
Alphabet Match 2
Bytheway, I'm using a new service to hold my files called box.net let me know how you like it compared to sribd, which i was using in my past posts. Thanks!
Julie
Saturday, October 11, 2008
Oops! Animal Homes...
For some reason, I forgot to add the animal home cards to the the other document (that document just had the animals and the control cards). So sorry! I just went back and added them to the previous post. You can see both documents here:
http://homemademontessori.blogspot.com/2008/10/animal-homes-nouns.html
Next, I will start working on continent cards and pink language series cards (all different kinds). My 4 year old is finally understanding how letter sounds form words and I want some cards for her to work on while schooling my son. So I'll be busy and I'll post them here when I'm done.
Friday, October 10, 2008
Animal Groups--Noun
These cards are for the lesson on page 37. These cards are the animals, their groups and the control cards. I still need to make the animals and their young cards that is also a part of this lesson. I hope to have those made this weekend as well. I finally got the bright idea to put the name of the group of cards on each individual card so if one goes astray and you find it later you will know where it goes! So in the bottom right of these cards it says "animal groups" I haven't printed these out yet, I just got done making them (I'll be printing and laminating them tommorrow), so I hope the "animal groups" is big enough to read, but light and small enough not to distract from the rest of the cards. let me know how you like it.
Animal Homes--Nouns
This is for the language arts lesson on page 33 of the montessori research and development elementary manual. I'm so glad to finally be done with them! Thanks so much for those that have been leaving comments. I love reading them and I'm so glad others are using my cards and ideas. It helps keep me motivated to make these cards because I'm not just making them for me, I'm saving so many other people from having to spend the hours making them too! Here is my latest cards...it's a long document, but worth it. Let me know how you like it!
Animal Homes
Animal Homes Document 2
Animal Homes
Animal Homes Document 2
Monday, October 06, 2008
Give Me a Five!
I'm back from vacation! I got sick right after I got, so I was MIA for a while. I wanted to share my experience about teaching my son to tell time, but I remember how confusing it can be and how hard it can be to remember that the 2 stands for 10 minutes, etc. I taught my son (he just turned 6) the o'clocks first and of course that was no problem. Then I put the clocks away and introduced him to the 5 short and long chains and arrows. I had him arrange the short one first and he did that easily. Then we worked on the large one. I wanted him to learn to count by 5's so he could just count by 5's around the clock to tell the minutes until he just 'remembered' on his own after some time. So after we worked on the long chain and arrows, I asked him to find a pattern on the numbers. If you look at the ones digit, I pointed out that there is a pattern of 5, 0, 5, 0, 5, 0, etc. Then when you look at the tens digit you get 1, 1, 2, 2, 3, 3, 4, 4, etc. so I pointed out that there is two of each number in the tens while the ones just repeat the pattern 5, 0, 5, 0, etc. So then, I had him write the numbers to 60 counting by 5's on his own (we never even practiced or learned counting by 5's yet) and using the pattern he was able to figure it out. It took him like 7 minutes to figure it out and write the numbers down, but now when he if he forgets what comes next, he thinks of the pattern.
Okay, so that's all fun and honkey dory, but what does that have to do with givin' me a high five? PRACTICE of course! I needed him to practice counting by 5's and he was already burnt out from the chains and writing numbers, but we needed to practice while it was all still in his head nice 'n fresh (he he). So I told him why we call it give me a five (because we have 5 fingers) so I would say "give me 40" and then he would give me 40 fingers, which meant he had to count to 40 by counting by 5's and give me a "5" each time he counted until he got to 40. He thought it was a great game! We continued practicing while I cooked dinner...stirring with one hand, learning to count by 5's with the other, he he. But now he can count by 5's. It's great because now when we're standing in line I just say "give me 85" and he's entertained and learning! He's getting much faster. After doing this for a while, we brought out the clocks and I said start at the number 1 and count by 5's and told him that was how many minutes. So now he checks the hour, counts by 5 around the clock and will give me the time. He's starting to associate 3 with 15 and 1 or 2 other numbers so he's much quicker now, but ideally, he can tell time already. He'll just keep getting quicker with more practice. What I thought was going to be a long process of trying to teach him to tell time, actually ending up only take a day and half and as excited as I was that he "got it" so quickly, I was kinda said, because now my cute clock cards I bought and my cute teaching clocks are neglected. Ah well! Hope this helps someone else!
Okay, so that's all fun and honkey dory, but what does that have to do with givin' me a high five? PRACTICE of course! I needed him to practice counting by 5's and he was already burnt out from the chains and writing numbers, but we needed to practice while it was all still in his head nice 'n fresh (he he). So I told him why we call it give me a five (because we have 5 fingers) so I would say "give me 40" and then he would give me 40 fingers, which meant he had to count to 40 by counting by 5's and give me a "5" each time he counted until he got to 40. He thought it was a great game! We continued practicing while I cooked dinner...stirring with one hand, learning to count by 5's with the other, he he. But now he can count by 5's. It's great because now when we're standing in line I just say "give me 85" and he's entertained and learning! He's getting much faster. After doing this for a while, we brought out the clocks and I said start at the number 1 and count by 5's and told him that was how many minutes. So now he checks the hour, counts by 5 around the clock and will give me the time. He's starting to associate 3 with 15 and 1 or 2 other numbers so he's much quicker now, but ideally, he can tell time already. He'll just keep getting quicker with more practice. What I thought was going to be a long process of trying to teach him to tell time, actually ending up only take a day and half and as excited as I was that he "got it" so quickly, I was kinda said, because now my cute clock cards I bought and my cute teaching clocks are neglected. Ah well! Hope this helps someone else!
Nouns: Common and Proper Nouns
Here are more noun labels! For the lesson on page 31. I have the animal and animal homes cards almost done. Hopefully they'll be this week. It's taking so long because the control cards have pictures of the animals on them and I have to photoshop those pictures first. But I wanted the control cards to be a spiral bound book with pictures so my kids to make it more interesting. I'm excited for them!
Nouns: Person, Place, & Thing
Here are my cards for teaching nouns. I made them to use with the Montessori Research and Development Elementary Language Arts curriculumn (that is great, I highly recommend it!). If you use that, it's for the lesson on page 29
Wednesday, September 24, 2008
Back to School!!
Well hello everyone! I hope everyone is having a great back to school! I have been MIA. I flew to Utah to visit my parents for 3 weeks and during that 3 weeks we also went to two different parts of Idaho and California to visit my other sisters besides also visiting another one of my sisters in Utah as well. It was really crazy, but a ton of fun! I got back a week ago, but then got sick! Just my luck, eh? (had to throw the eh in there for my Canadian mom!)
Anyways, just wanted to let you know I'm back and will be spending my saturday's getting more language arts labels made and put up on here so look forward to that! Also, for geography I will be doing a quicker study of the 7 continents (we learned about them last year, non-montessori style and not as in-depth as I wanted too) and then we'll move onto some states in the US. As I was thinking about making my continent boxes a few days ago, I thought of the idea of pizza boxes! I had no clue what to store my continent/country/state boxes in as we make them. A friend of mine in Wisconsin uses pizza boxes to hold her quilt pieces as she's making her quilts (she has several she makes at a time so this is how she organizes). Anyways, I thought it would be perfect. It's skinny so it won't take up much space. Just stack a bunch up on one shelf, however, it's large enough to hold larger pictures and thick enough to hold small 3-d objects, flags, money, etc. My friend got her pizza boxes at a pizza restuarant. She would just ask them if she could buy a box from them and they charged her $1 for a new/unused pizza box. If you have a membership Sam's club sells them in bulk for really cheap as well.
Anyways, just wanted to let you know I'm back and will be spending my saturday's getting more language arts labels made and put up on here so look forward to that! Also, for geography I will be doing a quicker study of the 7 continents (we learned about them last year, non-montessori style and not as in-depth as I wanted too) and then we'll move onto some states in the US. As I was thinking about making my continent boxes a few days ago, I thought of the idea of pizza boxes! I had no clue what to store my continent/country/state boxes in as we make them. A friend of mine in Wisconsin uses pizza boxes to hold her quilt pieces as she's making her quilts (she has several she makes at a time so this is how she organizes). Anyways, I thought it would be perfect. It's skinny so it won't take up much space. Just stack a bunch up on one shelf, however, it's large enough to hold larger pictures and thick enough to hold small 3-d objects, flags, money, etc. My friend got her pizza boxes at a pizza restuarant. She would just ask them if she could buy a box from them and they charged her $1 for a new/unused pizza box. If you have a membership Sam's club sells them in bulk for really cheap as well.
Sunday, August 10, 2008
Dominoes!
Whoever said dominoes were just a game? I think dominoes are a great learning tool, especially for early addition. I bought my son his own dominoes and I sit him down with them and a piece of paper. He picks a domino and counts how many dots are on one side of the line and writes that number down. Then he does the other side and puts the + then the number. Then at first I have him count all the dots for the = I have him do about 10 problems at a time. After I know he is familiar with the dominoes with the + 0's, 1's and 2's, I separate those dominoes into their own bag and i have him pick 10 of those dominoes and have him count the two sides, but he trys to figure out the answer without counting.
He loves doing his math like this. It's so much more entertaining for him than worksheet after worksheet...and you don't need counters or anything other manipulatives.
Also, once they are getting good at memorizing the equations and answers, switch from dominoes to dice. Give your child a die and have them roll it and then roll it again and have them add the two numbers. Still worksheets aren't necessary! Also, at a teacher supply store they have dice that go up higher (like 20 sided dice) or blank dice. You can get a blank die and 2 normal die. with the blank dice put the numbers 10-60 on them and have them roll the ten's dice and then a normal one to get the first number like "40" and then "2" so 42 is the first number and do it again to get the second number and add them together for harder problems.
Saturday, July 26, 2008
Map Storage--Really Cheap! Holds 8 maps

I bought 4 of the 8 maps to start out our homeschool with and just didn't want to spend the $90 on a map holder. So I had the idea to use the metal cube organizers from target, like these ones: http://www.target.com/Whitmor-Set-Storage-Cubes-Black/dp/B000LRBSFI/ref=sc_ri_1/602-3618519-8739042
In store they were only $12 and there was 6 cubes in the box (they have many different kinds and I got the cheapest). Instead of using the wierd connectors they came with, I used cable ties that are by the auto department in walmart. You get a bag of 50 ties for $1.23 I used about 4 bags, but that many isn't necessary. I made it 2 cubes wide and one cube tall. I found out the hard way that it's easiest to do the bottom, then one side then the back and then the other side. Then put all the shelves together (connect 2 cubes together) and then connect them to the rest and then put the top on last. The more cable ties you put on the more weight and the sturdier the shelves are. It works great and it looks good. Every horizontal line on the cube I made into a shelf. I had enough cubes so that there is a spot for 8 maps and I am just one cube short to make another shelf (there's room for just one more shelf) to hold cards or anything you want. Total cost for my map holder was just under $20. I bought another box of cubes and did the same thing that was just once cube by one cube to use for my 2 year old's wooden knob puzzles too. Finally they're more organized!
Thursday, July 17, 2008
Language Arts Labels
It's been a while! Sorry! My kids and I have been sick all winter! I'm just getting back in the groove of things now and I have made several labels for language arts. I am using the Montessori Research and Development Manuals. I am making the labels for the Elementary level 1 language arts & grammar. These manuals are awesome and I highly recommend them. They are very affordable and great quality. So these labels go with those lessons, but can be used in your own lessons as well.
Wednesday, March 05, 2008
Large Number Cards
 I thought this would be something I would just buy, orginally. I mean it's just $10. Then I found out that to do the activities with them you need 2 sets of large number cards and 3 sets of small number cards and then decimal cards! That's $50 +shipping without the decimal cards. Didn't take me long to change my mind, LOL. Here are my large number cards and instructions on how to make them!
If you don't want to cut them from wood, make them from foam, cardboard or cardstock :)
(9) 2" x 2.5"
(9) 4" x 2.5"
(9) 6" x 2.5"
(9) 8" x 2.5"
 Then you need 3 sharpies in red, blue and green. Write the numbers 1-9 in green on the pieces that are 2". Use a blue sharpie and write the numbers 10-90 (10, 20, 30, etc.) on the 4" pieces. Use the red sharpie and write the numbers 100-900 on the 6" pieces. Then use the green again and write the numbers 1000-9000 on the 8" pieces.
**Remember to space your numbers nicely on the spaces. You should have 1 number for every 2 inches of the board. That way when you stack them ontop of each other you are fully covering the 0's underneath.
Hope this helps you! I'll be finishing up my small number cards soon too!
Fruit and Vegetable 3 part cards


Here are the fruit and vegetables cards I made a while back. I finally printed and laminated them! These are available to download for free on my website.
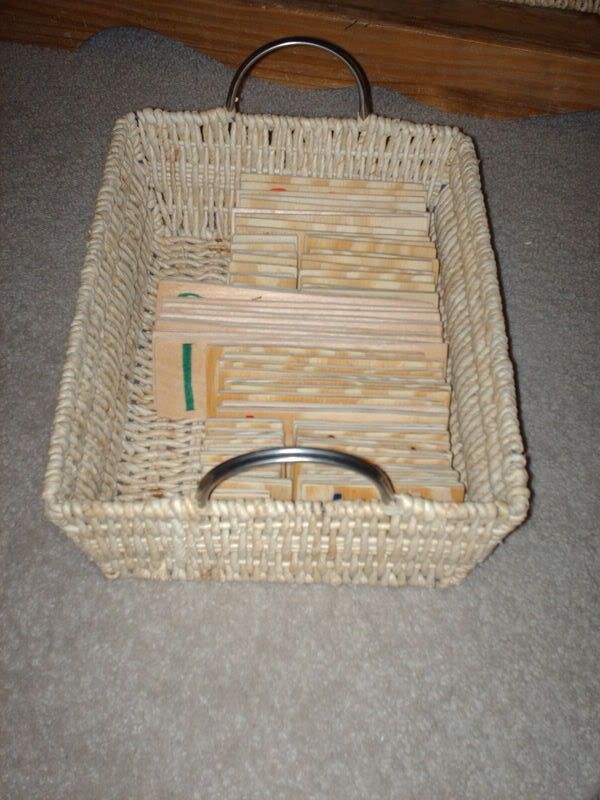
Ten Board
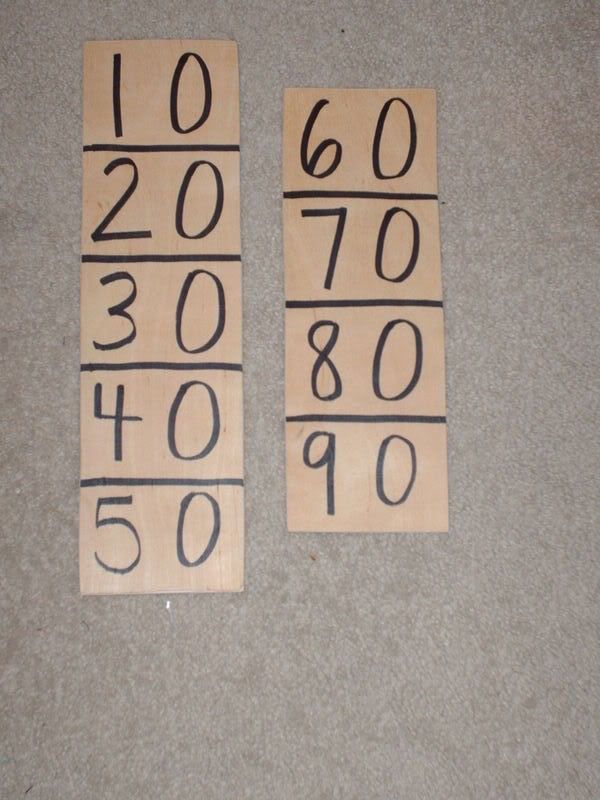
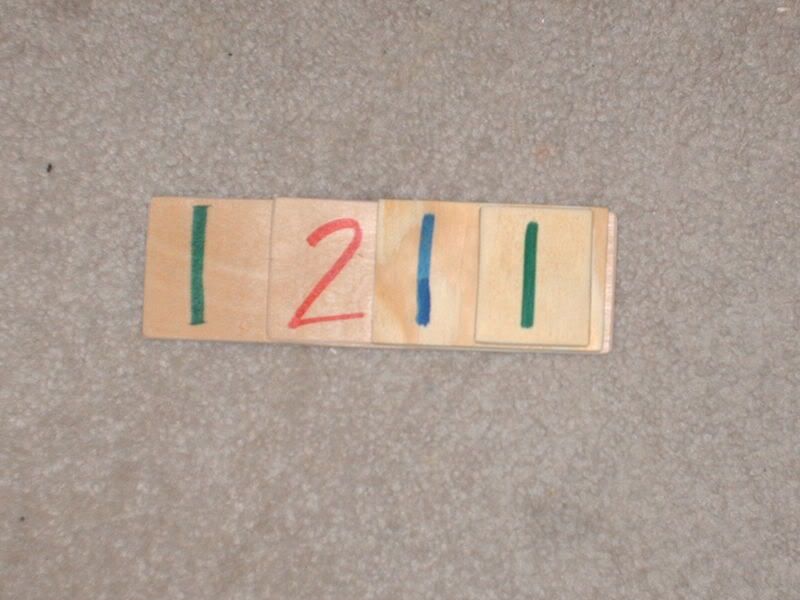
You make this the same way as the Teen board, same dimensions and everything. The only difference is you'll have the numbers 10-90 written, instead of all the numbers being 10. The little pieces will still have the numbers 1-9 on them.
Teen Board
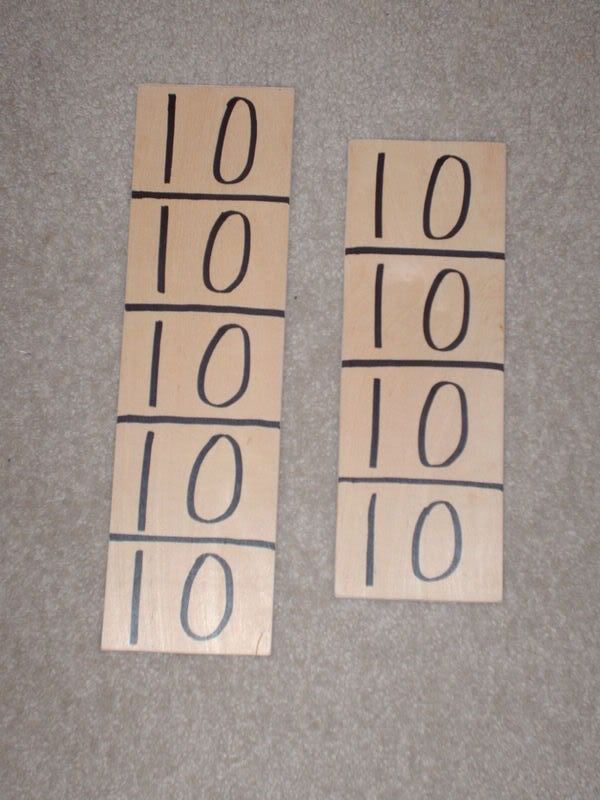 I finished these boards up yesterday. I didn't finish the numbers to put ontop of them yet. They are waiting to be sanded. I've been sick these last 2 weeks with a head cold that just makes me so sleepy! Anyways, here's how to make the teen boards.
 Cut a piece of wood 16"x5"
another one that's 13"x5"
Then 9 pieces that are 3"high x2" wide
the 16" board will be separated into 5 sections and each section will have the number 10 written on it. The 13" board will be separated into 4 sections. The 3"x2" pieces will have the numbers 1-9 written on them. I just used a chisel tip (fat) sharpie marker in black to make the lines on them. You could also wood burn them in (which would be really cool) or paint them on or vinyl numbers, etc. Have fun! They're really easy to make and again, much more fun then cardstock. If you can't cut with wood, make them from foam sheets, or foam board, felt, etc. Use your imagination. I just think a more 3d object makes learning more fun than paper :)
Color Sorting/Color Wheel
 I got this deviled eggs tray from party city this morning for $2. I painted the bottom of each egg a different color. Then I got my container of odd buttons that I have in my craft room and found 5 buttons of each color (well, I need 1 more dark green and 2 more orange that'll I'll buy next time I'm at the craft store). I tried to put the colors in order so it'd look like the color wheel so you could use it for those activities later on, but I was doing it off the top of my head quick and I know the brown isn't in the right place. But thought I'd mention it so someone else could do it in the right order, LOL. My 3 year old can't wait for the paint to dry
 so she can get sorting!
Sunday, February 24, 2008
Geometry!
I'm getting ready to start teaching geometry in the fall to my son. I just made the first and second series cards for my son. Download them free on my website.
Money Cards
I made some penny and nickel cards for extra practice for my son. He was having a hard time getting the concept that one coin (nickel) means 5 cents. How 1 equals 5, he just wasn't understanding. He just kept getting all the coins confused because he wasn't getting this concept so these cards have really been helping! To download them go here
Friday, February 22, 2008
Download 3 part cards!
I made some 3-part cards for my montessori classroom. I made a quick website so I could place those files on there. Everything is free to download and remember that you are free to use them for your own personal use. Do not sell them!
My Website
My Website
Wednesday, February 20, 2008
Bead Stair

Besides my wood cutting/sanding, I've been working on the bead stair and beads for everything the decimel activity, decanomial board, snake game, negative snake game, long and short chaings, etc. You need a lot of beads! I bought most of my beads from http://shipwreckbeads.com/ I bought 8mm arcylic multi-faceted round beads in all the different colors. For $4.95 I got 900 beads of each color. The only color they were missing was brown and I just put in a order for that somewhere else! So for $45 I got all the beads I should ever need (besides the gold ones). I got the gold 8mm round beads from Joann's in packs of 400 for $3.95. Wait for the jewelry to be on sale (it frequently goes on sale for 25-30% off) and then if you are a homeschooler or teacher you can get a Joann's teacher card that will give you an additional 15% off all regular, sale and clearance items (whenever you don't use a coupon!). I also bought the wire there. I am using 16 gauge wire. I use gold wire for the gold beads (it looks so pretty this way!) and the silver for all the other colors. I used math u see with my son last year and just sold the blocks to someone online, but kept the boxes. I'm hoping all the beads for the decanomial set will fit in here. So far I have 55 10 bars, one, two, and three bars..the rest just have about 20.
Here is the colors to make the Bead Stair:
1 red
2 green
3 pink
4 yellow
5 light blue
6 brown
7 white
8 violet
9 dark blue
Scroll Saw
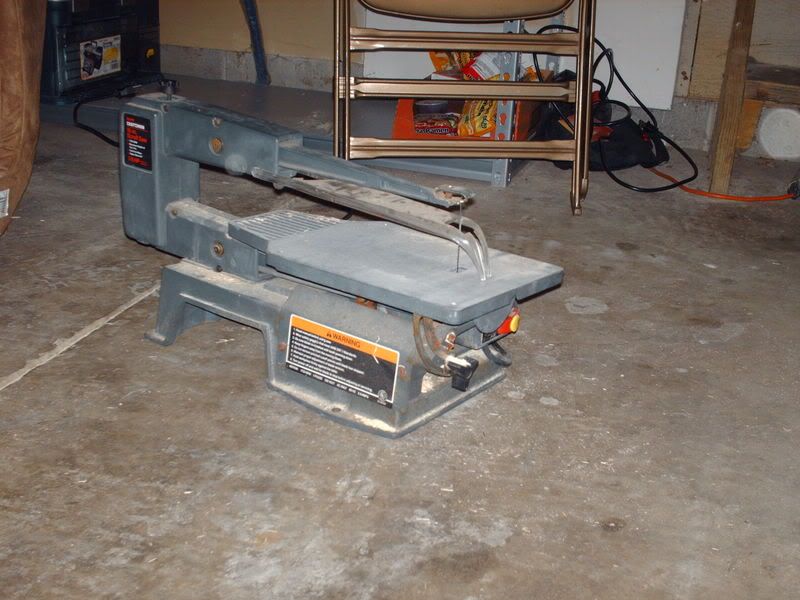
When I first decided I wanted to make wooden montessori materials instead of laminated cardstock, I thought I would need to buy everything new, because there was no way buying a $150 scroll saw and then the cost of wood and the time making it was actually going to be cheaper than just buying the materials. I went searching on my local craigslist and low and behold! I scroll saw for $40. Yeah! The guy I bought it from didn't know much about it and I couldn't find the instructions anywhere online. Oh well. How hard could it be really? It's actually not hard at all. Once you figure out how to put a fresh blade in.
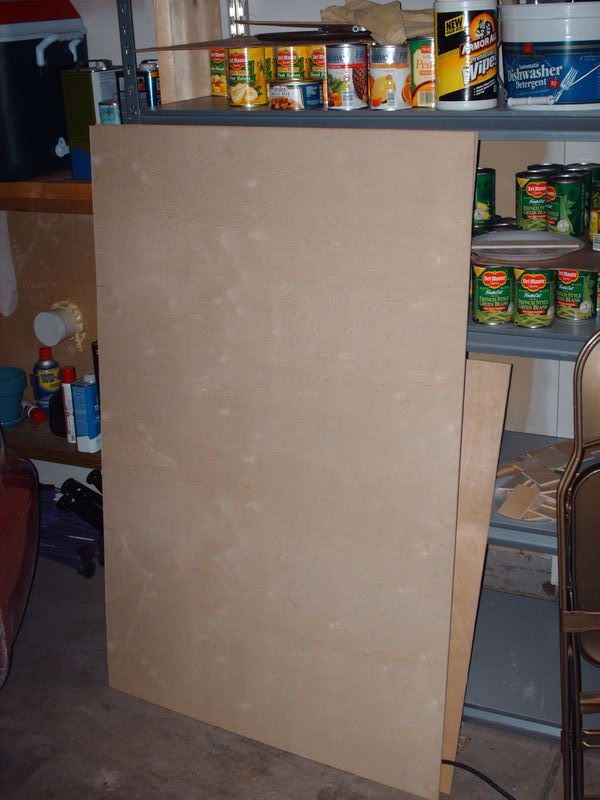
Now, what about the cost of the wood? Surely, that was going to be expensive...or so I thought. I never really realized how little wood I would actually need and how reasonable it was. I bought a 4'x8' piece of beautiful Birch plywood from Lowe's that was 1/4" thich for $20. I had the at Lowe's cut it into 1/3's since Lowe's and Home Depot will give you 2 free cuts of wood. This made it fit in the car easy and then I cut one piece into 1/3's with my jigsaw to make it easier. I think next time, I will tell the Lowe's guy to cut the sheet into 1/5's so I won't have to do that. To give you an idea of just how much wood it was this is a picture of 1/3 of the wood I got.
With 1/3 of this wood, I have already cut the pieces for these materials:
Addition Board & strips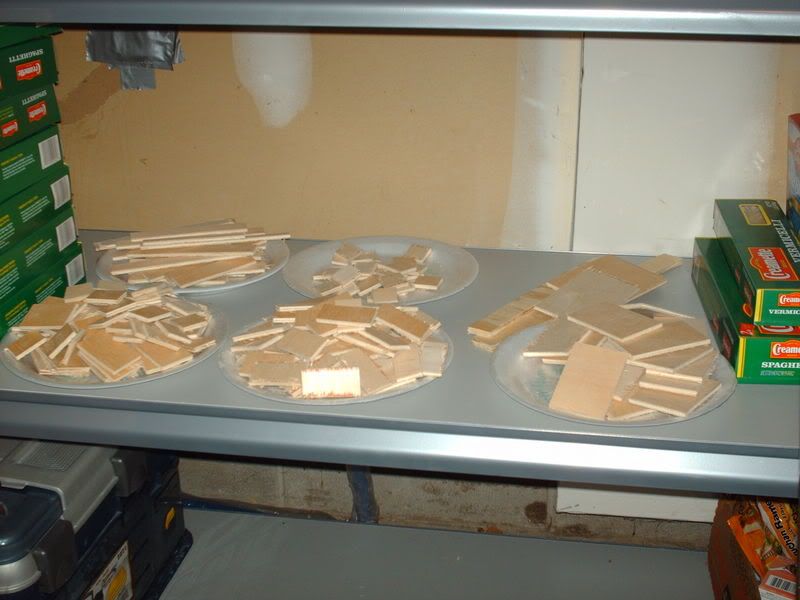
Subtraction Board strips
2 Sets of Large Number cards
3 sets of small number cards
85 addition strips
30 addition answers
Ten Boards and numbers
Teens Boards and numbers
So really in the end, it has proven to be very inexpensive. It's more time consuming to make than laminated cardstock, however, the results are a lot prettier, long lasting and my son is getting so excited over the materials.
Monday, February 18, 2008
Writing Tray

My 3.5 year old, Abby has known her letters and their sounds for over a year thanks to the leap frog letter factory movie! She hasn't shown an interest in learning to read though, until recently. She is more interested in writing though. She's always asking me to help her write her name and loves to sit with her brother Josh (5.5) and just write and color for hours now. I made up these writing trays for her. Super cheap, too! Walmart had these cool colored sands. They are in the crafts section and there were lots of different colors. It was only $1.92 for a tall skinny bottle of this stuff. Then I just bought a 4-pack of gladware containers and poured a little in. I made 3 of them, because you know when one kids does something they all want to do it! After making 3 of them, it only used up 1/4 of the bottle. So just in case, Nikki (the almost 2 year old...in two weeks!) decides to dump her sand out the second I turn my back, I can refill it, LOL.
Trays!

My husband got a HUGE migraine Saturday night and was just in so much pain. I ran to the gas station to get Excedrin Migraine for him and then after that wasn't enough, I got to go to the grocery store to pick up his prescriptions! What a fun night for me!
Well it ended up being a better deal than I thought! My local Kroger had these wonderful home decor baskets clearanced out so cheap! I got these because they look more like deep trays then a basket, so I thought they would be perfect for holding the number cards or other things. I got 4 of each style. The kahki baskets were $1.82 each! So that awesome or what?? The other baskets, look nicer, but are smaller. They were $4 each. I am very happy with my find! Now I just need to find some plastic trays for the water practical life activities and the land/water forms. I know target usually carries them over the summer, so I am waiting for that!
Cubico Game

I saw this game in my Montessori Play and Learn book, on page 67. I thought it was a neat game! It is made up of 9 die. Each side of each die is a different color with a number on each side. The child then picks a color and arranges the die in rows 3x3 so that when you add the first 2 numbers in the row it equals the 3rd number. You can add vertical and horizontally and it should all work. Instructions are on page 67 of this book as well as pictures. http://www.montessorimaterials.org/ has paper die that you can cut out for this game if you wish.
http://www.montessorimaterials.org/Math/Cubico.pdf
You will learn quickly that I am someone that loves the wooden materials. They are so much more durable and I have 3 children and my oldest is 5 1/2 so they will be used for a long time. I'd rather put it a little more effort and money now, then have to remake everything every year. My children can get rowdy, LOL.
How I made these:
JoAnn Fabrics had a package of 3 wooden cubes for $0.99. They were about twice the size as a regular dice so I thought it was perfect size for this game. I bought 3 packages and painted each side a different color and then put the numbers on! It didn't take very long to do this. It was not expensive and it will be long lasting. I found wooden indoor/outdoor craft paint that was non-toxic at walmart and will be spraying it tomorrow with non-toxic protectant.
Subscribe to:
Posts (Atom)